Difference between revisions of "UBIK Client Basics"
(→Positioning) |
(→Locked objects) |
||
| Line 160: | Line 160: | ||
==== Locked objects ==== | ==== Locked objects ==== | ||
| − | In some cases it might be useful to lock objects until the user varifies to be near to these objects. This can be done with the [[SYSCLS_UNLOCK_BY_SCAN]] {{Version/AndroidSince|2.5.2}} and [[SYSCLS_UNLOCK_GROUP_BY_SCAN]] {{Version/AndroidSince| | + | In some cases it might be useful to lock objects until the user varifies to be near to these objects. This can be done with the [[SYSCLS_UNLOCK_BY_SCAN]] {{Version/AndroidSince|2.5.2}} and [[SYSCLS_UNLOCK_GROUP_BY_SCAN]] {{Version/AndroidSince|3.1.0}} classifications. Instances of MetaClasses implementing this classification can only be edited after the object gets unlocked. The unlocking can currently happen by scanning any type of code (QR-Code, Barcode, ID-Marker, RFID, OCR) which is related to the according object. After a certain period of time (default 15min) the object gets locked again. In the case of Unlocking a group of objects, alternatively also more than one object can be unlocked at once by sharing a common unlock code. |
Take care that objects classified by [[SYSCLS_UNLOCK_BY_SCAN]] also need the corresponding properties (e.g. QR-Code property) such that the user is allowed to unlock these objects. In the case of unlocking a group of objects, only one of the objects needs to be scannable in order to onlock all of them. If an object is locked, it is not possible to edit its properties. Furthermore, context actions like redlining or editing of documents, geo teach-in and deletion of the object on the server is not possible. Basically the locking is the same for all types of objects, except for work packages – unlocking them also means unlocking all underlying items (Tasks, Commissioning checks) as well. | Take care that objects classified by [[SYSCLS_UNLOCK_BY_SCAN]] also need the corresponding properties (e.g. QR-Code property) such that the user is allowed to unlock these objects. In the case of unlocking a group of objects, only one of the objects needs to be scannable in order to onlock all of them. If an object is locked, it is not possible to edit its properties. Furthermore, context actions like redlining or editing of documents, geo teach-in and deletion of the object on the server is not possible. Basically the locking is the same for all types of objects, except for work packages – unlocking them also means unlocking all underlying items (Tasks, Commissioning checks) as well. | ||
Revision as of 08:20, 17 January 2019
UBIK® Client is the mobile application for viewing and modifying data, showing documents, starting navigation, visualizing POIs and much more.
Client applications are available for Android and WinX, however the features available on each of the platform dependent applications might differ. An overview of the available features can be found in the feature comparison table.
Contents
[hide]Start Screen
The start screen (or start menu) is the first visible view. It contains the login button and several actions, most of them accessible only after login. The start screen's content is configurable. For any specific app, the start screen usually also has a (overwritable) default configuration compiled into the app.
Login
Users need to login in order to access confidential data, this can be done in the Login Dialog.
There is the possibility to define user credentials on a webservice. The user might get a different login UI then, for further information please take a look at Serverside Account Configuration.
Settings
Users can configure access and edit the settings controlling UBIK® environment using the settings list.
Action Bar
On the top of every UBIK® Android view, there is the action bar. It provides features like the free text search and buttons for receiving/sending changes from/to the server. Depending on the customization, other items like a Support button or a QR Code Scan button can be available. In some views, there are different actions than in others; e.g. in the map view there are map-specific actions.
The action bar also allows access to the navigation drawer. It also shows an icon of the currently viewed object or the app's logo if the view is not object-related.
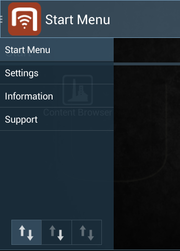
The navigation drawer provides a convenient and familiar way of navigating the app. There are two ways of opening/closing the drawer.
- Pressing the app logo in the top-left corner;
- Swiping from/to the left edge of the screen
| Drawer item | Purpose |
|---|---|
| Start menu | Opens the start screen |
| Settings | Opens the Settings |
| Information | Shows information about the software version and the device |
| Scanning | Contains child items for scanning various codes and markers. |
| AR | Contains child items for opening the Map or POI view. |
| Support | Starts the communication application (e.g. Skype or Visocon) and is available in the UBIK.Android.Demo application only. It is used to directly get in touch with a support agent. The respective target Uri is configurable. |
| Sync mode | Switches UBIK® between different sync modes |
Info Screen
Shows static information about the app, like the version code and the minimum required web service version. It also contains additional buttons:
- Install Certificate: Allows to add a server certificate to the app.
- Clear Cache: Deletes all local data for the current user.
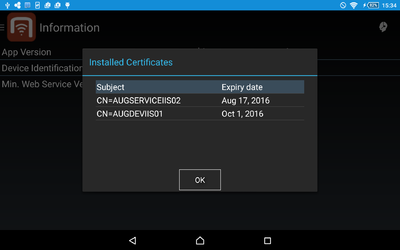
- Show Certificates: Shows a list of installed certificates, with alias/subject and expiry date.
Content Browser
Allows to navigate through the entire data model in a hierarchical manner, as it is published by the server.
Initially, a list of objects ("root objects") is shown. Upon selecting an object, a new browser is opened for that object, showing details about it. When an object is selected in the content browser, it is called the browser's context. For such a contextual object, child objects, properties and child documents are shown. Also, there is a context menu providing actions related to the currently selected object.
As every UBIK® Android activity, the content browser also contains an action bar on the very top. By default, it provides a search button and buttons for updating an object or sending changes to the server ("committing").
Context Menu
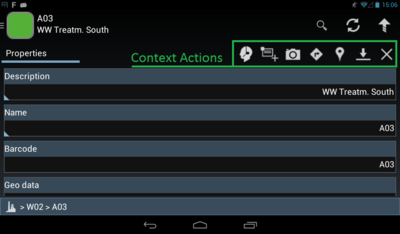
In the Content Browser a context sensitive menu is available where actions can be triggered that are relevant for the currently viewed object. For example the creation of a child element or showing this object in another view.
| Icon | Action item | Purpose |
|---|---|---|
| Create Object | Opens a selection dialog for possible child MetaClasses, creating an object for the user's choice. The new object is opened in a view for editing. | |
| Take Picture | Opens the camera activity and creates a new document object for the resulting picture. The new object is opened in a view for editing. | |
| AR Navigation | Opens the AR navigation activity in order to navigate to the current object using augmented reality. | |
| Geo Actions | Opens a selection dialog for several geo-related actions.
| |
| Download Branch | Downloads the current object and all children and switches to offline mode. | |
| Delete Actions |
Provides several actions for reverting or removing the current object:
| |
| Teach-in Actions |
Provides several actions for teaching-in values of scannable properties:
|
Objects
Root objects vs child objects
The first entry point in the Content Browser is the list of root objects. Since no element is viewed initially, there is no Context Menu here.
If an object is opened in the Content Browser, it serves as its current "context". The list of its child objects is shown in the left tab of the content browser when viewing an object.
Task objects
Task objects are UBIK® objects with properties the user has to fill in. They can be identified by the status check box that shows their status (open or finished).
Query objects
Query objects are used for finding objects on the server using criteria entered on the client.
Safety relevant objects
The Safety Instructions feature allows to make sure a user has to view special Safety Documents before an object can be opened in the Content Browser.
Commissioning objects
Commissioning objects are task objects with extended functionality. They can be identified by the status ican which either shows a cross a check or a circle.
Locked objects
In some cases it might be useful to lock objects until the user varifies to be near to these objects. This can be done with the SYSCLS UNLOCK BY SCAN and SYSCLS UNLOCK GROUP BY SCAN classifications. Instances of MetaClasses implementing this classification can only be edited after the object gets unlocked. The unlocking can currently happen by scanning any type of code (QR-Code, Barcode, ID-Marker, RFID, OCR) which is related to the according object. After a certain period of time (default 15min) the object gets locked again. In the case of Unlocking a group of objects, alternatively also more than one object can be unlocked at once by sharing a common unlock code.
Take care that objects classified by SYSCLS UNLOCK BY SCAN also need the corresponding properties (e.g. QR-Code property) such that the user is allowed to unlock these objects. In the case of unlocking a group of objects, only one of the objects needs to be scannable in order to onlock all of them. If an object is locked, it is not possible to edit its properties. Furthermore, context actions like redlining or editing of documents, geo teach-in and deletion of the object on the server is not possible. Basically the locking is the same for all types of objects, except for work packages – unlocking them also means unlocking all underlying items (Tasks, Commissioning checks) as well.
Properties
In the Content Browser, properties are shown in the properties tab. Their appearance depends on the data type of their value, whether they are modifiable and whether they are currently modified. Also, modifiable properties can be edited using the property editors described below.
Live value properties
If a user wants to know an up-to-date measurement value, for instance whether it is save to enter a room or shut down a pump, this property provides him this information with very frequently updated live values.
Direct editing of boolean properties
The user can switch Boolean properties by either clicking the checkbox in the property list view (without visible editor), or by clicking the property row to open the corresponding editor.
Selective List Properties
The user can select a value from a list of possible values for this property, by clicking on the saved property value on the property list view. The corresponding editor is displayed with the drop-down list already expanded. Once the user selects a value from the list, the value is immediately saved and editor closed. It is also possible to cancel the editing or delete the value.
Teach-in Actions
Properties of type QR-Code, Barcode or RFID can be taught-in using the corresponding teach-in action, which is located in the context sensitive action bar. An object has to implement the SYSCLS OBJECTWITHIDMARKER or SYSCLS OBJECTWITHRFIDTAG classification and a respective editable property in order to use this feature. When clicking on a teach-in action the corresponding scanner appears and once the right marker/tag is scanned, the code directly appears as the new property value.
Default and Initial Values
Default values are used as long as a property has no value on its own. Initial values are used for new instances so they aren't completely empty after creation. Both can be configured on the server. See also: MetaProperty Wiki Article
Editors
UBIK® has built-in editors for different property types, including String, Integer, Double, Boolean, DateTime, Geo data and Selective list. Clicking on the input field of a property (or task) will open the respective editor.
Geo Editor & Teach In
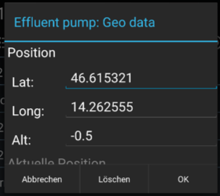
Editor used to set GEO locations for a specific content object. This is done by accessing the GEO property editor of the object.
The user can enter the location manually or, if available, can use the location provided by the positioning service. In case the positioning service doesn't deliver any location the user has only the possibility to enter the location manually.
Documents
UBIK supports and displays document objects and a bunch of actions related to them (editing, redlining, creation, thumbnails, ...). See the Documents article for further information on documents.
MRO
UBIK provides the logic for Maintenance, Repair and Operations (MRO) features. This means, a user can report the status of work to be accomplished. Therefore specific MRO configuartions provide essential objects like workpackages and tasks to report accomplished tasks, results and confirmed workpackages. See the MRO article for further information on MRO.
Dynamic Content Tabs
The content browser's tabs (children, properties and documents) are only shown if necessary (and if they are not empty). For some types of objects (e.g. tasks) specific tabs are always shown though, especially if a tab is considered the main view for that object.
It is possible to configure this feature in order to behave more precisely as desired. By default, the children tab is shown if no other view should be shown explicitely and if the client has no information whether there are children or not. This means that for objects where (by customizing) the properties tab or the documents tab should be shown when entering the browser, the children view is only shown if it is not empty.
However, if nothing is configured, the children tab will be shown by default, because there could be children on the server and it would be annoying for the user to not see the children tab at all until something is loaded.
This is the other way round for the properties tab, because properties are always known as soon as the object itself is available on the client.
Also, the documents tab is not shown by default because the documents most often are not the primary view. If they are, the customizing should take this into account.
Customizing Possibilities
There are basically two ways to configure the dynamic tabs feature:
- One can configure the Children Information Classification (former: Document Owner Classification): this will lead to a precise behaviour of the dynamic tabs, because the client has more detailed knowledge about the children of respectively classified objects.
- Another possibility is the configuration of the SYSCLS SHOWPROPERTIES or SYSCLS SHOWDOCUMENTS classifications: this will lead to the displaying of the properties/documents tab as initial view, even if it is empty.
UI Configurations
See UI Configuration (Mobile Client).
AR Features
POI View
Brings up the Augmented Reality view and displays Points of Interest (POI's) related to the current location of the mobile device.
Allows the user to navigate to an object using the Augmented Reality Navigation feature. It is accessible via a UBIK® object's context menu in the Content Browser.
Markerless
Opens the Augmented Reality view supporting Markerless Scanning based on Image Detection. If the scanned Object is a Geo-Object, it´s location can be used through Object Proximity Positioning
ID Marker 3D
Opens the Augmented Reality view supporting ID Marker Scanning based on ID Markers. If the scanned Object is a Geo-Object, it´s location can be used through Object Proximity Positioning
Map View
Opens the Map view and displays Points of Interest (POI's) related to the current location of the mobile device.
Positioning
UBIK® clients use a Location Manager in order to gain knowledge about their position, so it can help the user navigate to his/her target.
Finding Objects
Free Text Search
A free text search feature is available in the Action Bar. The search action item opens a text input field when clicked. Use it to find objects by their Meta Class name, their Display Strings or properties. The search feature works online and offline.
ID Marker
Provides a fast and convenient way for users to find objects that are identifiable through optical codes, in this case ID Markers. If the scanned Object is a Geo-Object, it´s location can be used through Object Proximity Positioning
QR Code
Provides a fast and convenient way for users to find objects that are identifiable through optical codes, in this case QR Codes. When using Getac Z710 the integrated barcode/qr-code scanner can get used. If the scanned Object is a Geo-Object, it´s location can be used through Object Proximity Positioning
Bar Code
Provides a fast and convenient way for users to find objects that are identifiable through optical codes, in this case Bar Codes. When using Getac Z710 the integrated barcode/qr-code scanner can get used. If the scanned Object is a Geo-Object, it´s location can be used through Object Proximity Positioning
RFID
Provides a fast and convenient way for users to find objects that are identifiable through RFID tags. If the scanned Object is a Geo-Object, it´s location can be used through Object Proximity Positioning
OCR
Provides a fast and convenient way for users to find objects that are identifiable through OCR. If the scanned Object is a Geo-Object, it´s location can be used through Object Proximity Positioning.
Synchronization
The UBIK® client gets its data from the UBIK Content web service and is capable of synchronizing differences between this service and itself. All data can be worked with offline.
Updating and Committing
Sending changed data from the mobile device to the UBIK® server is called "committing". Fetching new data from the server is called "updating".
In UBIK® Android's Action Bar, there are buttons for both actions. Their detail behaviour depends on the current view:
- In the Start Menu, the update button acquires basic data like the meta definitions or the infrastructure objects. The commit button opens the Commit Manager.
- In the Content Browser, the update button updates the currently viewed object and its children. Similarly, the commit button sends changes for the currently viewed object to the server. When committing an object in the Content Browser, all its changed child objects are also committed.
- In the Commit Manager, one can select objects to commit or update from a list of all changed objects.
Synchronization Mode
Depending on the Sync Mode setting, the synchronization will behave differently - either taking care of everything automatically or giving the user full control over which changes are sent ("committed") to the server and which updates are fetched from it.
There are the following Sync Modes:
- Automatic: Handles updates and commits without requiring user input.
- Manual Commit: Updates automatically, lets the user decide when to commit changes.
- Offline: Doesn't update nor commit anything automatically; except for special situations like the first login in a new environment.
Error Handling
UBIK® tries to solve problems automatically, for example by retrying failed web requests or updating missing content. In case of an error that couldn't be resolved automatically, an Android Notification is shown to gently notify the user what has happened and eventually give hints on how to solve the problem.
Push
The UBIK® push service is a mechanism used to notify a client of updates, show messages to the user or trigger other events on the client.


