
POI View
POI view is the Augmented Reality view that displays Points of Interest (POI's) related to the current location of the mobile device.
Contents
Prerequisites

For the POI view to function and deliver a satisfactory user experience, a device's processors must meet certain requirements (support NEON from ARM).
Devices such as the following are known to lack such a technology and, therefore, can not use the POI view.
- Samsung Galaxy Tab 10.1 P7500
- Samsung Galaxy Tab 8.9 P7300
- Unitech TB100
Visualization
A typical POI view consists of a real time camera view, a radar view and a few billboards.
Radar view
At the top right corner of the POI view, there is a circle shaped radar view which displays all the POI's as yellow dots. The positions of these POI's relative to the device are reflected and constantly updated in the radar view. If a billboard is currently selected (the last one touched), its dot in the radar view is marked with red color. POI groups are also represented as billboards in the radar view.
Billboard
Billboards are visual representations of POI's. A billboard consists of the following:
- Icon;
- Description text;
- Name text;
- Text of distance to the current location;
- Background color representing the status of the POI.
All these visual elements are updated when either the content or the current location changes.
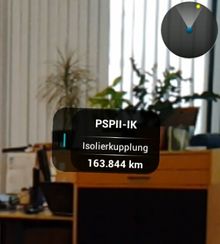
POI view
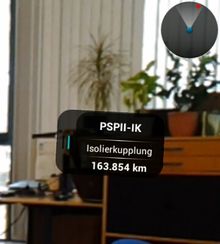
Selected POI in radar
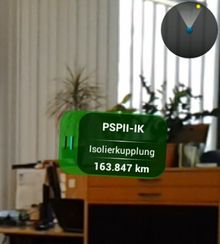
Colorized Billboard


Only Geo contents are displayed as billboards, qualifying certain conditions:
- If a POI group is currently open/active, objects that are shown are:
- POI group items that belong to the current group;
- Objects that are not POI group items (and do not belong to any group).
- If a layer is currently selected, objects that are shown are:
- Items of the current Layer;
- Objects that are not layer items.
Interaction
Interacting with billboards
When a user touches a billboard, a dialog for that particular POI will show up.
Scanning Optical Markers
Two types of optical Markers can be scanned from the POI view: LLA Markers and AR-Markers. The former can be used for device pose estimation (Object Proximity Positioning), whereas the latter can be used for device pose estimation and direct augmentation.
Action items (Android)
The following action items are available in the POI view's action bar.
| Icon | Item name |
|---|---|
| |
Layers button |
| |
Compass calibration button |
| |
LLA only mode button |
Layers button

Geo content can be configured on the server side to belong to a certain layer. By pressing the layers button, a dialog containing all the available layers will be displayed. By checking/unchecking the layers in the dialog box, users can filter out content that belong to the unwanted layers.
Compass calibration button
This button can be used in order to calibrate the compass, e.g. for a demonstration use case or if it points in the wrong direction. When it is clicked, the compass will behave as if the current heading was north (for WinX see CalibrationHeading setting). Technically, a compass offset setting is used in the background. Therefore, in order to use it, do the following:
- Turn the device so it looks at where you want it to believe that north is.
- Click the button.
LLA only mode button
Sometimes, it is necessary to temporarily turn on LLA only mode. For example, once the users enter a building where GPS or other locating systems are not reliable enough, they could, however, use the on-site LLA markers to precisely locate themselves. Afterwards, the LLA only mode can be turned off so that the users can continue to use the locating systems outside the building. UBIK® provides a LLA only mode button in the POI view for scenarios like this.

LLA Only Mode deactivated

LLA Only Mode activated
If LLA only mode is active when entering the POI view the toggle button is not shown.
If LLA only mode is inactive when starting the POI view, there is a toggle button in the POI view:
- A single click on it would switch UBIK® from the current positioning mode to LLA only mode.
- Another click from LLA only mode to the previous mode.
The toggling of the positioning mode only happens within the POI view. When the POI view gets in the background (either by closing or by opening a different view) the initial positioning mode gets applied.
When LLA only mode is active, UBIK® ignores all other location updates except the ones from scanning LLA markers.
| During LLA only mode, UBIK® stops most of its location services. However, services such as GPS require a long initializing time before they can be used. Considering the fact that LLA only mode is often switched on and off for a short period of time, UBIK® keeps such services on "standby" for a while so that the mode switching is smooth and instantaneous. |
Location Mode Indicator
UBIK® provides an indicator showing the user if LLA only mode or any other positioning mode is currently active. This indicator is toggled by clicking the LLA only mode button.
| Icon | Description |
|---|---|
| |
Shown if LLA only mode is currently active. One should not move as no position updates (except the ones from LLA markers) are obtained. |
| |
Shown if any positioning mode different from LLA only mode is active. One can move freely as position updates are obtained continuously. |
Flashlight
UBIK® provides a button which toggles the Camera´s Flashlight to increase the readability of optical markers in bad illuminated environments.