| (59 intermediate revisions by 4 users not shown) | |||
| Line 1: | Line 1: | ||
Image map overlays will be visualized as base maps in the map activity of the client. These are images (.png) that will be vizualized on the right location, with the right scale and also with the right rotation. Therefore georeferencing of the image is required. | Image map overlays will be visualized as base maps in the map activity of the client. These are images (.png) that will be vizualized on the right location, with the right scale and also with the right rotation. Therefore georeferencing of the image is required. | ||
| − | + | Configuration of the image map overlay requires two steps:<br/> | |
| + | # '''Georeferencing of the image''' | ||
| + | #* This is necessary to generate the required parameters. | ||
| + | #* Prefered Software: [http://www.google.com/earth/download/ge/agree.html Google Earth] | ||
| + | #* How to add a map overlay to Google Earth is available under [https://support.google.com/earth/answer/148099#createoverlay Add a Map Overlay (Google How To German)] | ||
| + | # '''Configuration of the Image Map Overlay in UBIK Studio''' | ||
| + | #* The Map Overlays objects are based on file documents, hence must implement properties of the classifications [[SYSCLS DOCUMENT | Document]], [[SYSCLS FILEDOCUMENT | Filedocument]] and [[SYSCLS_MAPOVERLAY | MapOverlays]] | ||
| − | + | = Georeferencing (GIS Software) = | |
| − | + | There are many possibilities to georeference a map overlay. For image map overlays [http://www.google.com/earth/download/ge/agree.html Google Earth] is the fastest way to extract the required parameters. | |
| − | + | This How-To is a short introduction for adding a Map Overlay to Google Earth and capturing the parameters for {{UBIK Studio}}. | |
| − | + | # Prepare an image map overlay | |
| − | + | #*The map overlay should be a .png image of the building scheme. | |
| − | + | # Add the map overlay to the basemap | |
| − | + | #* Tutorial of Google Earth: [https://support.google.com/earth/answer/148099#createoverlay Add a Map Overlay (Google How To German)] | |
| + | # Extract the required parameters: | ||
| + | #* '''WIDTH_METERS''': The width of the image in meters. Please use the measurement tool of Google Earth: [https://support.google.com/earth/answer/148134?hl=en Measuring distances and areas]<br/>[[File:UI_Width_inMeters.PNG|400 px|border|alt=View|View]] | ||
| + | #* '''ROTATION_CLOCKWISE_DEGREES''': The rotation can be extracted by using the editing tool of Google Earth for image map overlays.<br/>[[File:UI_GoogleEarthImageEditing.PNG|400 px|border|alt=View|View]] | ||
| + | #*'''LOCATION_CENTER''': To extract this parameter it is required to use the Placemark tool of Google Earth and locate the placemark in the center of the image. How to use a placemark tool: [https://support.google.com/earth/answer/148142?hl=en Creating a new placemark] | ||
| + | #** The location can be extracted by using the editing mode of the placemark.<br/>[[File:UI_LocationCenter.PNG|900 px|border|alt=View|View]] | ||
| − | == | + | |
| − | + | {{Attention|Please use the Google Earth Show Lat/Long setting with Decimal Degrees [[https://support.google.com/earth/answer/148070?hl=en HowTo: Viewing preferences]]. }} | |
| − | # | + | |
| − | + | = Studio = | |
| − | # | + | === Add an Image Map Overlay === |
| − | + | To add a Map Overlay it is required to take the parameters from the georeferenced Map Overlay Image: | |
| − | # | + | # Navigate to the [[MetaClass]] ''IMAGEMAPOVERLAY'' via the ''[[Class Browser]]''<br/> [[File:IMagemapoverlay.PNG|220 px|border]] |
| − | #* | + | # Create a new object in the {{Bulk Editor}} |
| + | #* Choose the Filetype (PNG) | ||
| + | #* Set a '''Name''' and '''Description''' | ||
| + | #* Select the image in the Bulk Editor (FULLPATH) | ||
| + | #* Set '''Is Local''' to TRUE | ||
| + | #* Set the '''Location Center''' by filling out the '''[[SYSCLS GEO|Geo Property]]''' <br/>[[File:UI_ExampleObjects_BulkEditor.PNG|990 px|border|alt=View|View]] | ||
| + | #* Set the '''Rotation Clockwise Degree''' | ||
| + | #* Set the '''Width''' (in Meters) | ||
| + | #* Set the '''Z-Level''' (Default: 0) | ||
# Save the object with {{key press|Ctrl|S}} | # Save the object with {{key press|Ctrl|S}} | ||
| − | |||
| − | |||
| − | == | + | === Publish the Map Overlay === |
| − | To publish the Image Map Overlay to the UBIK | + | To publish the Image Map Overlay to the {{UBIK}} client the [[Application_Context_Management | ACM]] has to be configured: |
| − | #Create a | + | #Create a [[METACLASSSCOPE]] for the Image Map Overlay MetaClass |
| − | #* HowTo: [[HowTo:Create_a_new_MetaClassScope | + | #* HowTo: [[HowTo:Create_a_new_MetaClassScope]] |
| − | # Assign the Properties to the | + | # Assign the Properties to the Scope |
| − | #* Required Properties | + | #* Required Properties within the ACM: |
| − | #** WIDTH_METERS | + | #** ''WIDTH_METERS'' |
| − | #** Z_LEVEL | + | #** ''Z_LEVEL'' |
| − | #** ROTATION_CLOCKWISE_DEGREES | + | #** ''ROTATION_CLOCKWISE_DEGREES'' |
| − | #** LOCATION_CENTER | + | #** ''LOCATION_CENTER'' |
| − | #** FILETYPE | + | #** ''FILETYPE'' |
| − | # | + | # Relate the MetaClassCcope to the according [[CONTEXT]] |
# Save the object with {{key press|Ctrl|S}} | # Save the object with {{key press|Ctrl|S}} | ||
| − | # [[Release_MetaDefinitions | Release the MetaDefinitions]] | + | # [[HowTo:Release_MetaDefinitions| Release the MetaDefinitions]] |
# Check the Classification in the ACM Manager | # Check the Classification in the ACM Manager | ||
| + | === Add Image Map Overlay to Infrastructure === | ||
| + | To finally display the image overlay on the client it is necessary to put it right into the application's infrastructure. | ||
| + | # Open the according [[CONTEXT]] in the ''[[Relation Editor | Relation Editor]]'' | ||
| + | # Add the newly created overlay object per drag and drop, from the [[MetaClass]] ''IMAGEMAPOVERLAY'', to ''"Infrastructre objects"'' ([[SYSREL INFRASTRUCTURE|SYSREL INFRASTRUCTURE]]) <br/> [[File:ImageToACM.PNG|330 px|border]] | ||
| + | # Save the project with {{key press|Ctrl|S}} | ||
| + | The image map overlay has been added to your application. | ||
| + | <headertabs /> | ||
| + | == See also == | ||
| + | * [[SYSCLS_MAPOVERLAY]] | ||
| − | + | [[Category:Document|Create Image Map Overlays]] | |
| − | + | [[Category:How-To|Create Image Map Overlays]] | |
| − | + | [[Category:Publishing|Create Image Map Overlays]] | |
| − | + | ||
| − | + | ||
| − | + | ||
| − | + | ||
| − | + | ||
| − | + | ||
| − | + | ||
| − | [[Category:Document|Image Map Overlays]] | + | |
| − | [[Category:How-To|Image Map Overlays]] | + | |
| − | [[Category: | + | |
Latest revision as of 09:52, 6 December 2019
Image map overlays will be visualized as base maps in the map activity of the client. These are images (.png) that will be vizualized on the right location, with the right scale and also with the right rotation. Therefore georeferencing of the image is required.
Configuration of the image map overlay requires two steps:
- Georeferencing of the image
- This is necessary to generate the required parameters.
- Prefered Software: Google Earth
- How to add a map overlay to Google Earth is available under Add a Map Overlay (Google How To German)
- Configuration of the Image Map Overlay in UBIK Studio
- The Map Overlays objects are based on file documents, hence must implement properties of the classifications Document, Filedocument and MapOverlays
Georeferencing (GIS Software)
There are many possibilities to georeference a map overlay. For image map overlays Google Earth is the fastest way to extract the required parameters. This How-To is a short introduction for adding a Map Overlay to Google Earth and capturing the parameters for UBIK® Studio.
- Prepare an image map overlay
- The map overlay should be a .png image of the building scheme.
- Add the map overlay to the basemap
- Tutorial of Google Earth: Add a Map Overlay (Google How To German)
- Extract the required parameters:
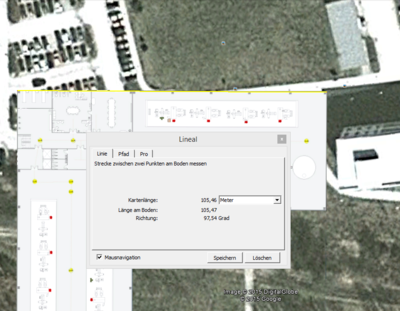
- WIDTH_METERS: The width of the image in meters. Please use the measurement tool of Google Earth: Measuring distances and areas
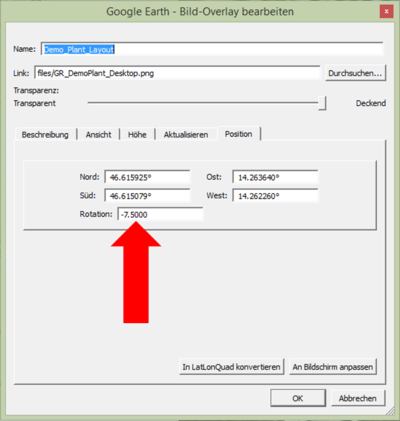
- ROTATION_CLOCKWISE_DEGREES: The rotation can be extracted by using the editing tool of Google Earth for image map overlays.
- LOCATION_CENTER: To extract this parameter it is required to use the Placemark tool of Google Earth and locate the placemark in the center of the image. How to use a placemark tool: Creating a new placemark
- The location can be extracted by using the editing mode of the placemark.

- The location can be extracted by using the editing mode of the placemark.
- WIDTH_METERS: The width of the image in meters. Please use the measurement tool of Google Earth: Measuring distances and areas


| Please use the Google Earth Show Lat/Long setting with Decimal Degrees [HowTo: Viewing preferences]. |
Studio
Add an Image Map Overlay
To add a Map Overlay it is required to take the parameters from the georeferenced Map Overlay Image:
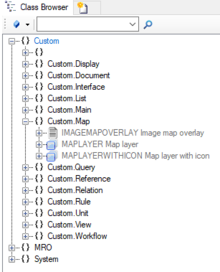
- Navigate to the MetaClass IMAGEMAPOVERLAY via the Class Browser
- Create a new object in the Bulk Editor
- Choose the Filetype (PNG)
- Set a Name and Description
- Select the image in the Bulk Editor (FULLPATH)
- Set Is Local to TRUE
- Set the Location Center by filling out the Geo Property

- Set the Rotation Clockwise Degree
- Set the Width (in Meters)
- Set the Z-Level (Default: 0)
- Save the object with Ctrl+S


Publish the Map Overlay
To publish the Image Map Overlay to the UBIK® client the ACM has to be configured:
- Create a METACLASSSCOPE for the Image Map Overlay MetaClass
- HowTo: Create a new MetaClassScope
- Assign the Properties to the Scope
- Required Properties within the ACM:
- WIDTH_METERS
- Z_LEVEL
- ROTATION_CLOCKWISE_DEGREES
- LOCATION_CENTER
- FILETYPE
- Required Properties within the ACM:
- Relate the MetaClassCcope to the according CONTEXT
- Save the object with Ctrl+S
- Release the MetaDefinitions
- Check the Classification in the ACM Manager
Add Image Map Overlay to Infrastructure
To finally display the image overlay on the client it is necessary to put it right into the application's infrastructure.
- Open the according CONTEXT in the Relation Editor
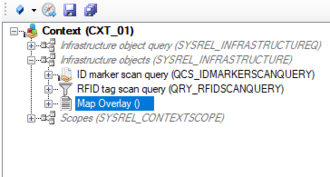
- Add the newly created overlay object per drag and drop, from the MetaClass IMAGEMAPOVERLAY, to "Infrastructre objects" (SYSREL INFRASTRUCTURE)
- Save the project with Ctrl+S

The image map overlay has been added to your application.