
Login View
For confidentiality reason, users are required to login before they have access to most of the UBIK® features.
Accessing login view
The login view is displayed after starting the app. It is possible to access the login view from every where in the app by pressing the login icon in the top right corner and selecting "log out".
At the top of the screen, the name of the most recently used profile (if any) will be displayed. When pressing "Login" without selecting a different profile first, this profile will automatically be used.
Profile selection


The name of the currently selected profile is displayed on the top of the view. By default, the last used profile will be selected here. It is possible to change the profile by pressing the Profile Button. The profile selection flyout will pop up, from which the user can select any profile (see the figure on the right).
To add custom profiles, you must add them under the app's RoamingState folder. You can also categorize your profiles using subfolders within this directory. You will see 2 different tabs when opening the profile selection view, with the third hidden by default.
Favorites
The "Favorites" tab shows profiles that the user has marked as favorites. To mark a profile as favorite, simply click the the star icon next to a profile's name. You will see it immediately appearing in the favorites list (sorted alphabetically). You can of course undo this action by simply pressing the star icon again to unmark the profile as favorite.
Recent
The "Recent" tab shows all available profiles, ordered by most recently used (at the top), to least recently used, excluding favorited profiles (which appear in the "Favorites" tab). When you click a profile anywhere in the selection view, it will be timestamped, and added to the top of the "Recent" tab.
Browser
To view the "Browser" tab, the user can click the expansion button on the right side to toggle the tab open or closed. The "Browser" tab shows all available profiles (including favorites), but displays them exactly as your file browser would, including sub folders. The user can navigate through sub folders simply by clicking them.
Login
UWP older versions

The login dialog is opened by pressing the Login button. The dialog also opens automatically after selecting a profile. The first time the user uses a single profile to connect to a service, he is asked whether the system should remember login and password (for the user and profile). If the user selects yes, the login dialog will not appear again and the credentials are used immediately the next time he connects by using the profile. If the user selects no, he has to enter his credentials every time.
UWP & Mobile clients
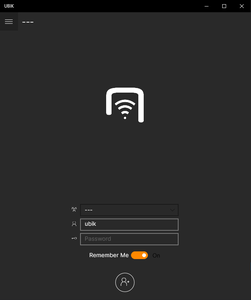
UBIK Mobile


UBIK® can remember multiple users per profile. By default, the last remembered one for the selected profile is used. And as you type in a different username, UBIK® constantly checks whether it is a remembered user. If so, the password is automatically filled so that you don't have to.
- A user can only be remembered after a successful online login, namely the username and password must be authenticated at least once by the server;
- If a new password is entered for a remembered user and it is authenticated by the server, the remembered one will be updated;
- By unchecking the remembering option and logging in, the remembered user will be "forgotten". This is also possible without a server authentication. Afterwards, offline login is still possible for this user.
Offline Login
Every successful online login is stored. The stored credentials are used for supporting offline logins.
| You can access a local database without online connection (offline) when the credentials were used once to connect successfully to the online service. |
Clear Cache
The clear cache feature (settings) deletes all the remembered credentials (login and password) from the system.
| Offline logins are not possible after clearing the cache until the user connected once at the online service. |
Team login
| This feature is now obselete. |


Team login allows a group of users to login with a single device and perform tasks together as a team.
Team login button
| This button is not available by default in the app, certain custom templates are needed for this. An example template can be downloaded |
Team login dialog
The team login dialog has the following parts:
- Profile selector to change profiles;
- Team member list (each member has a remove button at the right side);
- + button to add members;
- Login button;
- Close button.
The same login dialog shows up once the + button is pressed and the members should enter their credentials one by one. Once all the members are successfully added, press the Login button to login as a team.
| All members in a team should login to the same service, namely using the same profile. Therefore, the profile selector will be disabled as long as the member list is not empty. |
Login details
, it's possible for the client to receive login details of the current user as well as other users. Currently, that information is not displayed in the default UI. However, it's accessible under the globally available AppStatus through XAML customizing.
- AppStatus.CurrentLogin: The current login instance;
- AppStatus.AllLogins: All available login instances;
- AppStatus.UpdateLoginDetailsCommand.
It is recommended to use the developer mode to inspect what can be expected from each of these.
Technically speaking, the full login details come from the two following sources.
Current login
The client contacts the web service for the basic information of the currently logged-in user when switched to non-offline sync modes.
- UID: uniquely identifies the login/user;
- LoginName: name of the login/user;
- Image: user icon or profile image;
- DisplayStrings: descriptive texts.
This information is persisted in the database, therefore, also available offline as long as you have logged in online once.
Login instances
Login instances can be delivered just as any UBIK® content to the client. They can carry any amount of information which is accessible through RawDetails - a key value dictionary.
| If available, the instance matching the current login's UID will be used to extend the available login details. It's possible to have duplicate information in the current login, e.g. LoginName available from direct web service communication as well as the same named property through RawDetails. In such a case, it's recommended to take the former over the latter. |
Commands
Three commands are available for logging in/out.
- LogoutCommand;
- LoginCommand;
- ToggleLoginCommand: Log out if you are already logged in, log in otherwise.
LoginCommand and ToggleLoginCommand support an additional command parameter to automatically navigate to the root page after a successful login. The parameter can be both a simple boolean value, or a KeyValueList with a boolean value under the key of "NavigateToRootPageOnLogin". See examples below.
UWP
<Button...
Command="{Binding LoginCommand}">
<Button.CommandParameter>
<controls:KeyValueList>
<controls:KeyValueParameter Key="NavigateToRootPageOnLogin" Value="true" />
</controls:KeyValueList>
</Button.CommandParameter>
</Button>
Mobile(Xamarin)
<Button...
Command="{Binding LoginCommand}">
<Button.CommandParameter>
<classes:KeyValueList>
<classes:KeyValueParameter Key="NavigateToRootPageOnLogin" Value="true" />
</classes:KeyValueList>
</Button.CommandParameter>
</Button>