
POI View (Xamarin)
Similar to the POI view on our other UBIK® clients, the Xamarin version displays Points of Interest (POIs) based on the current location of the mobile device. A typical POI view consists of a real time camera view and a number of floating POIs.
Contents
POI
A POI is presented as a billboard which is sometimes also referred to as a bubble. By default, it visually contains some information about the object it represents. For example, the name, the description, the status color.
| We mention "by default" because the POIs can be customized to your liking. |
There are several types of POIs.
Geo POI
For all objects carrying Geo coordinates, a POI is displayed at the respective coordinates.
The app calculates the object's position relative to the user's and shows a POI approximately where the user would see the actual object through the camera, taking the following into account:
- The closer/further an object is, the bigger/smaller the POI gets;
- Once too far away, the POI is not shown;
- Those that are behind/above/below the user/device are not shown.
The look and feel of these POIs can be customized in UBIKWorldViewItemArea.xamlx.
Optical marker POI
Some objects are associated with certain optical codes, e.g. QR codes. The app displays POIs for such objects whenever the corresponding optical markers are detected/scanned. The POIs are always positioned close to the markers.
Simple optical marker POI
Such optical codes include barcode, QR code and OCR text - OCR is short for "Optical Character Recognition", meaning the app's ability to recognize text in images - which then can be associated with UBIK® objects and POIs automatically.
The UI of these POIs can be customized in UBIKDisplayViewItemArea.xamlx.
AR marker POI
Compared to other simple optical markers, AR (Aruco) marker POIs can make use of the additional information detected from the markers, namely the marker's relative distance and orientation to the device. Also, the placement of the POIs is more flexible and can be tailored. For details of such POIs, please refer to AR-Marker.
The UI of these POIs can be customized in UBIKCameraViewItemArea.xamlx.
Interact with POIs
In addition to the displayed information on POIs, you can also interact with them. A single tap on a POI selects or deselects it. Once a POI gets selected, several options become available on the right side of the POI view.

- Open the selected POI group or building; (only visible if the selected POI represents such types)
- Use the Geo location of the selected POI object; (also enters the select POI group or building)
- Browse to the selected POI object;
- Show a route to the selected POI object. See screenshots below for examples.
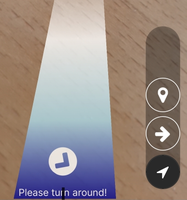
Turn Around
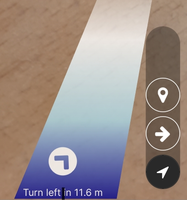
Turn Left


Group, Building & Level

To make a large number of POIs appear more structured and not cluster the view too much, POI groups are introduced. A POI group can be entered so that only those POIs that belong to that group can be displayed. The only exceptions are those that don't belong to any group. A building is a special type of POI group which consists of several building levels. Each level itself behave similar to a group in the sense that multiple POIs can belong to it and, therefore, only displayed when the level is active. Once a POI group or a building is entered, some additional options become available on the left side of the POI view.
- Displays the name and description of the entered group or building, click to exit;
- A list of buttons, each representing a building level, click to switch to that level.