
Configure EventNotification Endpoint and Enterprise Service for CUI
EventNotification Endpoint is a middleware which is responsible for receiving incoming COMOS event notifications, queuing them internally and forwarding them to the UBIK® Enterprise Service for further processing. This page describes how to setup the system.
Contents
Overview
- Make sure the Enterprise Service and the USAM are installed on the IIS Server.
- Install the Notification Endpoint Webservice on the IIS Server
- Configure all mandatory settings for the Notification Endpoint Webservice
- Configure the Notification Endpoint Webservice URL in COMOS and enable notifications
- Make sure all files are accessible
Install Notification Endpoint
- Download the Notification Endpoint Webservice from the release portal.
- Deploy the Notification Endpoint Webservice to the designated web app folder on the IIS Server (web app folder needs to be created if necessary)
- IIS Manager setting check: see IIS Manager
- Make sure COMOS is configured to send notifications.
IIS Manager
Please first create an Application Pool for Notifications in IIS. You can Name it like you want to, but please make sure that the .NET CLR version: "No Managed Code"

Direct Access
- Add a new website under the "Sites" folder in IIS Manager.
- Connect the new site to the corresponding physical folder via the website's "basic settings".
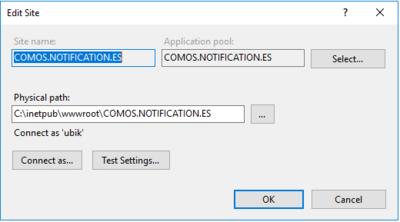
- "Site Name", "Application pool" and "Physical path" should be adapted by your setting, here are only example
- Configure a "Binding" for the website.
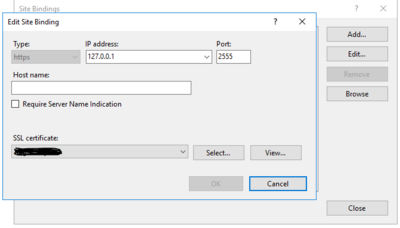
- The URL can be used as a direct access target,
- or used as an internal target for URL redirection.


Please make sure your configureed Port is not blocked by ohter Processes or the Firewall.
URL redirection
- Install URL redirect feature by using "Server Manager", to "Add Roles and Features Wizard":

- Click on the Web Site, which will be exposed to the outside
- Open "URL Rewrite" at "....Home"
- Add rule(s) as 'Inbound Rule' like the following:


Rewrite URL is defined base on direct access
Notification Endpoint
Adapt “Your/EventNotificationEndpoint/Folder/Configuration/config.json” file, configure at least the mandatory settings:
- "USAMUrl": The URL of the USAM Service
- "QueuePath": The folder containing all files, which will be sent to Enterprise Service for processing. After having been processed by ES, the corresponding files will be deleted.
- "InComingLogPath": All received COMOS notifications will be stored here
- "ProcessUrl": The URL of the Enterprise Service web interface
Optional settings:
- "LogPath": Path to your log files folder
- "DeleteLogAfter": Maximum age (in days) to keep log files for
- "DBkeys": Json string array containing the white list of COMOS DBkeys (empty or delete for receiving all DBkeys)
"USAMUrl": "https://comos03.augmensys.de/UBIK/USAM/USAM.svc",
"ProcessUrl": "http://localhost:9000/api/UbikContent/Content/",
"InComingLogPath": "C:\\Temp\\JSON",
"QueuePath": "C:\\Temp\\QUEUE",
"LogPath": "C:\\Temp\\LOGS",
"DeleteLogAfter": 10,
"DBKeys": ["db10"]
}
Enterprise Service
- Go to the UBIK.EnterpriseService folder,
- Copy and paste UBIK.Interface.CUI.dll to the “Injection” folder (create it if it does not exist).
- Open UBIK.EnterpriseService.exe.config, find the “appSettings” section, configure all necessary information, and add the "ContentControllerConfigPath" setting to the end:
<!-- System.Diagnostics.ProcessWindowStyle: Normal = 0, Hidden = 1, Minimized = 2, Maximized = 3 -->
<add key="ConsoleRunMode" value="1" />
<!-- Nothing = 0, Mark = 1, Delete = 2 -->
<add key="CommandFileAction" value="0" />
<add key="ClearWatchFolders" value="0" />
<!-- Path to json file. Pointing to EnterpriseServicePluginExecutionConfigHolder -->
<add key="PluginExecutionConfigPath" value="" />
<add key="ClientSettingsProvider.ServiceUri" value="" />
<!--TEST IF ONLINE USING BROWSER // GET http://localhost:9000/api/basicenterpriseservice/getuptimeinfo-->
<!-- switch on WebInterface: 1, switch off WebInterface : 0 -->
<add key="ExecuteWebInterface" value="1" />
<add key="ExecuteTaskByJsonFile" value="0" />
<!-- Notification Endpoint config ProcessUrl -->
<add key="WebInterfacePort" value="9000" />
<add key="WebInterfaceHost" value="http://localhost" />
<!-- Add this to the ES config file -->
<add key="ContentControllerConfigPath" value="your\setting\path\ContentController.json" />
</appSettings>
Make sure ContentController.json exists.
- Create or adapt ContentController.json according to your database connection:
"SqlConnectionDefinition":
{
"SSPI": false (or true, based on your DB setting),
"SQLUser": "username",
"SQLPassword": "password",
"SQLServer": "your SQL Server",
"SQLInitialCatalog": "DB name"
}
}
- Example:
- "SQLUser": "aaa"
- "SQLPassoword": "bbb"
- "SQLServer": "(localdb)\ProjectModels"
- "SQLInitialCatalog": "TEMPLATE.LOCAL"
Pay attention on JSON escape with ' \" ', ' \\ '
To Create a Service on your Server use the Command SC, to thest if the Server is configured Correctly open a cmd propmt as Admin and Type "SC" and you should get the help how to use as answer.
Depending if youre direktly on the Server or not you may have to use the Servername or not:
To Create:
To Name:
To Start:
if you want to rebuild after update you may use es first
To Delete:
After starting IIS and UBIK Enterprise server you can test if its working with calling the webpage, http://localhost:9000/api/basicenterpriseservice/getuptimeinfo on the Server, the answer will be a Json file with a short Text like this
This XML file does not appear to have any style information associated with it. The document tree is shown below.
<string xmlns="http://schemas.microsoft.com/2003/10/Serialization/">BasicEnterpriseServiceController is online at 11.04.2025 12:39:40</string>
With the UBIK.Notification.Endpoint there is a “example.curl.cmd” delivered for Testing the Notification Endpoint. If you open the file for editing at the start you have to insert your Servername and Port:

And at the end of the file you should find the DbKey you have to exchange it to your DBkey form setup.

After saving and running the command File you should get a Log in the Configured Log Folder, that should look mostly like this.

Now you Know that the Notification Endpoint is working with your Configuration.