Difference between revisions of "HowTo:Create a new ViewItem"
| Line 4: | Line 4: | ||
# There are three different ''ViewItem''`s | # There are three different ''ViewItem''`s | ||
## Create a new instance of a '''QueryViewItem''' using the ''[[Bulk Editor]]''<br/>[[File:UI viewitem 02.PNG|880 px|border|alt=View|View]] | ## Create a new instance of a '''QueryViewItem''' using the ''[[Bulk Editor]]''<br/>[[File:UI viewitem 02.PNG|880 px|border|alt=View|View]] | ||
| + | ## Assign a query instance of the ''QueryViewItem'' to the '''QUERY''' attribute either by | ||
| + | ##* dragging and dropping a query object onto the cell | ||
| + | ##* selecting the desired Query from the dialog appearing after double-clicking the cell | ||
## Create a new instance of a '''ReferenceViewItem''' using the ''[[Bulk Editor]]''<br/>[[File:UI viewitem 03.PNG|990 px|border|alt=View|View]] | ## Create a new instance of a '''ReferenceViewItem''' using the ''[[Bulk Editor]]''<br/>[[File:UI viewitem 03.PNG|990 px|border|alt=View|View]] | ||
| + | ## Set the name of the reference property in the REFERENCE cell | ||
| + | ## Set the REVERSE checkbox if the ''ReferenceViewItem'' should be evaluated from back to front | ||
| + | ## Assign a query instance of the ''ReferenceViewItem'' to the '''REVERSREFTYPE''' attribute either by | ||
| + | ##* dragging and dropping a metaclass object onto the cell | ||
| + | ##* selecting the desired MetaClass from the dialog appearing after double-clicking the cell | ||
## Create a new instance of a '''RelationViewItem''' using the ''[[Bulk Editor]]''<br/>[[File:UI viewitem 04.PNG|990 px|border|alt=View|View]] | ## Create a new instance of a '''RelationViewItem''' using the ''[[Bulk Editor]]''<br/>[[File:UI viewitem 04.PNG|990 px|border|alt=View|View]] | ||
| + | ## Set the REVERSE checkbox if the ''RelationViewItem'' should be evaluated from back to front | ||
| + | ## Assign a query instance of the ''RelationViewItem'' to the '''RELATION''' attribute either by | ||
| + | ##* dragging and dropping a realtion object onto the cell | ||
| + | ##* selecting the desired Relation from the dialog appearing after double-clicking the cell | ||
# Set at least name and description | # Set at least name and description | ||
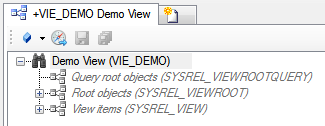
# The required ViewItem's must be added to the view with the ''[[Relation Editor]]''.<br/>[[File:UI_view_03.png|330 px|border|alt=View|View]] | # The required ViewItem's must be added to the view with the ''[[Relation Editor]]''.<br/>[[File:UI_view_03.png|330 px|border|alt=View|View]] | ||
Revision as of 10:07, 7 January 2014
In a view are different ViewItem`s used to evaluate the Query, the Relations or References between MetaClasses. This is seen in the View Test Environment.
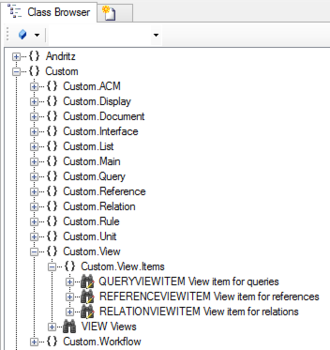
- Navigate to the Namspace Custom.View.Item's via the Class Browser
- There are three different ViewItem`s
- Create a new instance of a QueryViewItem using the Bulk Editor
- Assign a query instance of the QueryViewItem to the QUERY attribute either by
- dragging and dropping a query object onto the cell
- selecting the desired Query from the dialog appearing after double-clicking the cell
- Create a new instance of a ReferenceViewItem using the Bulk Editor
- Set the name of the reference property in the REFERENCE cell
- Set the REVERSE checkbox if the ReferenceViewItem should be evaluated from back to front
- Assign a query instance of the ReferenceViewItem to the REVERSREFTYPE attribute either by
- dragging and dropping a metaclass object onto the cell
- selecting the desired MetaClass from the dialog appearing after double-clicking the cell
- Create a new instance of a RelationViewItem using the Bulk Editor
- Set the REVERSE checkbox if the RelationViewItem should be evaluated from back to front
- Assign a query instance of the RelationViewItem to the RELATION attribute either by
- dragging and dropping a realtion object onto the cell
- selecting the desired Relation from the dialog appearing after double-clicking the cell
- Create a new instance of a QueryViewItem using the Bulk Editor
- Set at least name and description
- The required ViewItem's must be added to the view with the Relation Editor.

- Save the changes with Ctrl+S or the save command


