Difference between revisions of "HowTo:Add Languages to UBIK"
| (6 intermediate revisions by the same user not shown) | |||
| Line 2: | Line 2: | ||
#In the menu select ''Database → Database Manager'' | #In the menu select ''Database → Database Manager'' | ||
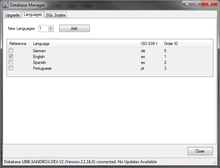
| − | #Change to the tab ''Languages''.<br/>[[File: | + | #Change to the tab ''Languages''.<br/>[[File:UI_HowTo_Add_Languages_01.png|220 px|border|alt=Add Languages|Add Languages]] |
#You see a list of the configured database languages on this tab | #You see a list of the configured database languages on this tab | ||
#Select the amount of languages you want to add in the field ''New Languages'' | #Select the amount of languages you want to add in the field ''New Languages'' | ||
| − | #Press {{key press|Add}} to create the new set of languages and confirm with {{key press|OK}}.<br/>[[File: | + | #Press {{key press|Add}} to create the new set of languages and confirm with {{key press|OK}}.<br/>[[File:UI_HowTo_Add_Languages_02.png|220 px|border|alt=Confirm Add Languages|Confirm Add Languages]] |
#The system will add the new languages to {{UBIK}} and execute all the necessary database updates. Once the creation is finished you will see additional entries at the bottom of the list. | #The system will add the new languages to {{UBIK}} and execute all the necessary database updates. Once the creation is finished you will see additional entries at the bottom of the list. | ||
| − | |||
| − | |||
| − | |||
==See also== | ==See also== | ||
| Line 16: | Line 13: | ||
[[Category:How-To]] | [[Category:How-To]] | ||
| − | |||
Latest revision as of 15:38, 2 February 2015
A set of languages can easily be added to the UBIK® database by using the Database Manager.
- In the menu select Database → Database Manager
- Change to the tab Languages.

- You see a list of the configured database languages on this tab
- Select the amount of languages you want to add in the field New Languages
- Press Add to create the new set of languages and confirm with OK.

- The system will add the new languages to UBIK® and execute all the necessary database updates. Once the creation is finished you will see additional entries at the bottom of the list.
