
Difference between revisions of "HowTo:Declare an Object as Map Layer"
| Line 2: | Line 2: | ||
<gallery widths="200" heights="220"> | <gallery widths="200" heights="220"> | ||
File:UI_MapLayer_01.png|Map View | File:UI_MapLayer_01.png|Map View | ||
| − | File:UI_MapLayer_02.png|Map | + | File:UI_MapLayer_02.png|List of available Map Layers |
| − | File:UI_MapLayer_03.png|Map Layer | + | File:UI_MapLayer_03.png|Select a Map Layer |
</gallery> | </gallery> | ||
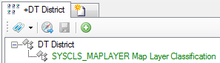
#Set the [[SYSCLS_MAPLAYER]] classification on the [[MetaClass]] of the object using the ''[[Class Details#Classification|Class Details]]'' control<br/>[[File:UI_HowTo_CreateANewMapLayer_01.png|220px|border|alt=Classify as Map Layer]] | #Set the [[SYSCLS_MAPLAYER]] classification on the [[MetaClass]] of the object using the ''[[Class Details#Classification|Class Details]]'' control<br/>[[File:UI_HowTo_CreateANewMapLayer_01.png|220px|border|alt=Classify as Map Layer]] | ||
Revision as of 08:48, 16 December 2013
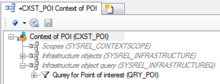
To make objects appear as Map Layers on the map they must be configured as follows:
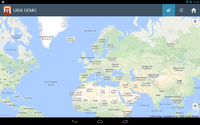
Map View

List of available Map Layers
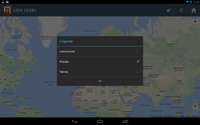
Select a Map Layer


- Set the SYSCLS MAPLAYER classification on the MetaClass of the object using the Class Details control
- The object needs to be added to the list of infrastructure object of the according Application, there are two different ways to achieve that:

- Individual objects can be added directly to the Infrastructure relation in the ACM using the Relation Editor.
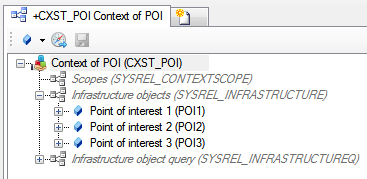
- To add multiple objects of the same type, a query has to be created and added to the Infrastructure query relation in the ACM.
- Individual objects can be added directly to the Infrastructure relation in the ACM using the Relation Editor.

