
Difference between revisions of "HowTo:Add a new file extension"
m |
m |
||
| Line 6: | Line 6: | ||
# Once the Admin mode is enabled you can add a new file extension by creating a new row and setting a description, name and value<br/>[[File:UI_HowTo_Add_a_file_extension_06.png|880 px|border|alt=Create a new Selective Item for a new file extension|Create a new Selective Item for a new file extension]]<!-- | # Once the Admin mode is enabled you can add a new file extension by creating a new row and setting a description, name and value<br/>[[File:UI_HowTo_Add_a_file_extension_06.png|880 px|border|alt=Create a new Selective Item for a new file extension|Create a new Selective Item for a new file extension]]<!-- | ||
-->{{Attention|The value of the new item must include the extension in the format *.wmv!}} | -->{{Attention|The value of the new item must include the extension in the format *.wmv!}} | ||
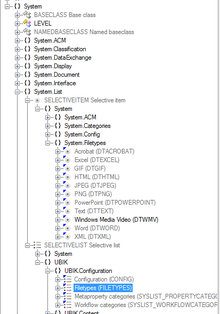
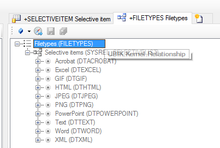
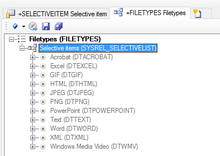
| − | # Now you have to related the new item to the list of known file types: first, browse to the MetaClass [[SELECTIVELIST]] within the ''{System.List}'' namespace and connect the list named ''FILETYPE'' with the {{Relation Editor}. Second, relate the new Selecive Item to this list.<br />[[File:UI_HowTo_Add_a_file_extension_07.png|220 px|border|alt=Add a file extension|Add a file extension]] | + | # Now you have to related the new item to the list of known file types: first, browse to the MetaClass [[SELECTIVELIST]] within the ''{System.List}'' namespace and connect the list named ''FILETYPE'' with the {{Relation Editor}. Second, relate the new Selecive Item to this list.<br />[[File:UI_HowTo_Add_a_file_extension_07.png|220 px|border|alt=Add a file extension|Add a file extension]] [[File:UI_HowTo_Add_a_file_extension_08.png|220 px|border|alt=Add a file extension|Add a file extension]] [[File:UI_HowTo_Add_a_file_extension_09.png|220 px|border|alt=Add a file extension|Add a file extension]]<br/>{{Attention|Please do not forget the save button.}} |
| − | + | ||
# [[HowTo:Release_MetaDefinitions|Release the new MetaDefintiions]] | # [[HowTo:Release_MetaDefinitions|Release the new MetaDefintiions]] | ||
# Restart the [[HowTo:Configure_Microsoft_IIS_for_UBIK|web service]] | # Restart the [[HowTo:Configure_Microsoft_IIS_for_UBIK|web service]] | ||
Revision as of 12:29, 19 February 2016
UBIK® knows a list of default file types and its extensions for documents. If you need an addtional extension it can be added by extending the system list of file types. The extensions also effects which application is used to open a document on the clients.
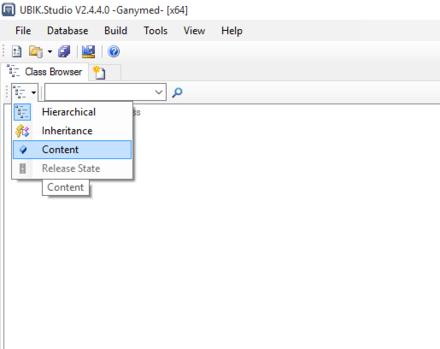
- Open UBIK® Studio, connect to a database and switch to the Content view of the Class Browser.
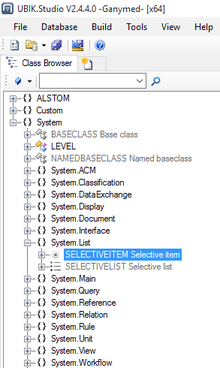
- Browse to the MetaClass SELECTIVEITEM in the {System.List} namespace and connect it with the Bulk Editor.

- As this MetaClass is a Built-in object you have to enable Admin mode to be able to add / modify entries
- Once the Admin mode is enabled you can add a new file extension by creating a new row and setting a description, name and value


The value of the new item must include the extension in the format *.wmv! - Now you have to related the new item to the list of known file types: first, browse to the MetaClass SELECTIVELIST within the {System.List} namespace and connect the list named FILETYPE with the {{Relation Editor}. Second, relate the new Selecive Item to this list.
Please do not forget the save button. - Release the new MetaDefintiions
- Restart the web service


