
Create a new Document (UBIK Android)
This article describes how to create UBIK® Document objects on the UBIK® Android client.
Contents
Prerequisites
Since UBIK® objects on the Android client are arranged in a hierarchy, every object (except root and infrastructure objects) have parents and, eventually, children. Therefore, in order to create any kind of object on the UBIK® Android client, a legitimate parent is needed.
It is necessary to configure this possibility in the Application Context Management (ACM) using the UBIK® Studio. You can find more information on publishing content on the mobile application in Make an Object appear on the Mobile Client.
More precisely, a MetaClass configured in the ACM can have so-called "possible child classes". If one of those is a document MetaClass, you can create such a document object as a child of an object which has the respective parent MetaClass. A MetaClass is a document, when it has a document classification.
For more information on documents on the Android client, please refer to Documents (UBIK Android).
As described above, a new object can only be created "under" a legitimate parent object. Hence, the first step to the creation of a new object on the UBIK® client is to browse the Content Browser and navigate to the desired parent object.
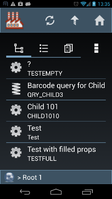
On the following, first two screenshots, you can see the Content Browser icon on the start screen and what the object list looks like.
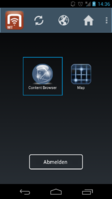
Content Browser Icon

Object List


For all successive levels (once an object is selected), the Content Browser displays not only the three tabs Children, Properties and Documents, but also context-sensitive actions. Browse down the hierarchy until you reach the parent object you want to attach a document to.
Content Browser

Using the Context Action for Content Creation
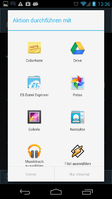
As mentioned, the Content Browser provides context sensitive actions for a currently viewed object. On the following screenshot, you can see the overflow menu button (three dots) which is displayed when the context action icons don't fit on the screen. In this case a click on it opens a dialog containing all the available context actions.
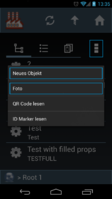
Context Action - Create new Content or Take a Picture

If you are using a tablet or the portrait orientation, the respective actions might be displayed as icons next to the tab view as well.
However, to create a new content object, you can either choose an object type (its MetaClass) or directly take a picture using the camera. If there are multiple "picture MetaClasses", you will be asked to choose one, though.
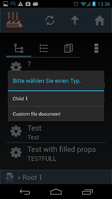
Choose Content Type

Choosing a File
Now, the actual file the document object refers to is addressed.
If the MetaClass you chose in the previous step was a non-document MetaClass, this step is skipped. Also, if you chose to take a picture, this step is replaced by the camera activity to create the file by taking a picture.
Normally you get to choose a file though, and this is done using any third-party file browser already installed on the device. If multiple file browsers are installed, you have to select one, as the following screenshot shows.
Choose a File Browser

Depending on the file browser, the process of choosing a file might differ, so there is no screenshot fo this (but I think you'll succeed nonetheless).
Finishing the Creation
After a file was selected, you can edit the properties of the newly created object or even cancel the creation. If everything is as desired, you can finish the content creation with a click on the OK button.
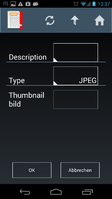
Edit the new Object

The newly created content should now be visible as a new document object in the thumbnail grid view (or if it wasn't a document, in the children list).
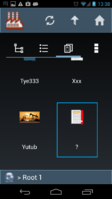
The new Document

Committing the new Document
Now it just has to be committed to the server and it will come back with a thumbnail and a description (if the ACM and the customizing is configured that way). This commit happens automatically in online mode but has to be done manually if manual mode is active (by clicking on the commit button ("upload" arrow) in the action bar. Congratulations!