Introduction
The Dynamic AR Content feature allows the user to see different actions according to the configurations.
The actions configured are 3d objects, movies and ubik objects.
Currently the feature is enabled for ID Marker and Markerless scanning.
Therefore, every time the user has scanned an id marker or a picture the corresponding object (3d object, movie or ubik object) should be processed and,
according to the configuration, a 3d object, a movie or a dialog should be shown onto the screen.
Setup
In order for one to be able to use the feature properly a setup folder is required and can be found at [1]. The setup folder contains:
- A root folder, named UBIK.
- The UBIK root folder contains a child folder, named ARConfig.
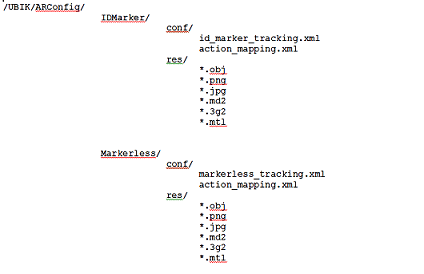
- The ARConfig contains two child folders named IDMarker and Markerless.
- IDMarker folder contains the resources and configuration files needed for scanning an id marker.
- Markerless folder contains the resources and configuration files needed for scanning a picture.
- IDMarker folder contains the resources and configuration files needed for scanning an id marker.
- IDMarker and Markerless folder contain a res and a conf folder. In the res folder all the resources needed for metaio and ubik
to show 3d objects, video and ubik objects are located. In the conf folder all the configuration files are stored.
- Example. In the following picture one can see a sketch of the folder structure.
In order for a 3d object to be displayed properly, the 3d object, the texture and the picture must all exist in the same place.
Action Mapping XML Setup
After the folder is configured and understood the next step is to actually configure the action mapping xml and the tracking data xml.
The action mapping xml contains different actions such as GeometryAction, MovieAction and UBIKObjectAction.
- In the xml below an example can be seen.
<GeometryAction TrackingID="1">
<GeometryResource>
<ResourcePath>pump.obj</ResourcePath>
<Scale>100</Scale>
</GeometryResource>
</GeometryAction>
<UBIKObjectAction TrackingID="2"/>
<GeometryAction TrackingID="5">
<GeometryResource>
<ResourcePath>pump.obj</ResourcePath>
<Scale>100</Scale>
<RotationDegrees>
<Z>90</Z>
</RotationDegrees>
</GeometryResource>
</GeometryAction>
<UBIKObjectAction TrackingID="6">
<UBIK-UID>a5aa5a70-591f-11e3-949a-0800200c9a66</UBIK-UID>
</UBIKObjectAction>
</TrackingActionMapping>
All the actions tags must have as an attribute a tracking id. The Tracking id must exist
in the tracking xml, the one that metaio needs in order to recognize id markers or pictures scanned.
GeometryAction Tag
The GeometryAction xml tag for a GeometryAction must contain a tracking id attribute. Inside the GeometryAction tag there can be a GeometryResource tag that defines the type of resource required for the GeometryAction.
GeometryResource Tag
The GeometryResource contains:
- Resource path. It is the resource path of the 3d object or video to be displayed.
- Scale. If it exists, it is the scale of the current object.
- OffsetMillimeters. If it exists, it is the translation vector of the current object. It has a X, Y and Z value, but not all them are mandatory.
- RotationDegrees. If it exists, it is the rotation of the current object.
- Resource path example. pump/pump.obj.
- OffsetMillimeters example.
<X>10</X>
</OffsetMillimeter>
MovieAction Tag
The MovieAction xml tag must also contain a trackingid attribute. Inside the MovieAction tag there are two possible resources, a MovieResource and a PlayButton resource.
MovieResource
The MovieResource Tag contains the same values as the GeometryResource except the rotation vector.
PlayButton Tag
The PlayButton Tag, if it is defined, contains the same values as the GeometryResource tag.
Tracking Data XML
First step that one has to do is to configure the tracking data xml in order for Metaio to recognize scanned pictures and ids.
In case one needs to scan pictures, the location of the pictures must be provided also. In our case it's ../res/pic_name.(png, jpeg).
The id located in the tracking data xml should be the same as the order of the id in the list of ids.
- Example. Below you can see an example where you need to configure the location of the image.
<SensorCOSID>1</SensorCosID>
<Parameters>
<referenceImage widthMM="420" heightMM="297">../res/img_pic.png</referenceImage>
</Parameters>
</SensorCOS>
