The Data Import Service is a interface consisting of a web service, hosted on an IIS service, which takes data pushed to Ubik and imports it efficiently. The heart of the service is a shared module called the Import System, which can be used to import data from whatever source they come, easing future interface developments. The system is highly customizable via Ubik Plugins to fit most use cases.
In detail, the service consists of three major parts:
- Web Service
- Customizable Authentication Mechanism
- Customizable Import Mechanism
Web Service
The Web Service contains the externally callable endpoint, containing the type reference of the import object in the URL and the data in the body:
In order to import one object of the type Example.Test, which contains one integer and one string parameter, the service needs to be called in the following way:
Authorization: <depends on AuthenticationValidator>
Content-Type: application/json
{
"ImportParameters":
[
{
"Key": "IntValue",
"Value": 5
},
{
"Key": "StringValue",
"Value": "Hello World!"
}
]
}
The object Example.Test together with its two properties is assumed to be provided via plugins (see below).
This request expects some Authentication data, which is completely dependent on the customized implementation provided via plugins (see below).
If you want to develop an interface to get data from your 3rd party system to Ubik, you might want to consider using this system as well. It's easy to set up and requires minimal configuration on the Ubik side.
Return
Let's analyze an example of this return message:
"Status": 0,
"UbikObjectId": "9c3b2bef-e0a5-4703-b9da-39c0ad43553d",
"ElapsedTime": 0.0415932,
"Message": "Successfully created one object."
}
- The
Statusfield has three possibilities:-
0: The item has been successfully created. -
1: The item has been successfully updated. This happens when an existing object has been identified by the Primary Key (configuration ofImportProcessorand on the Ubik-Proxy required). -
2: An error occurred while creating/updating the object. Read the message!
-
- The
UbikObjectIdallows for easy identification of the erroneous object in Ubik. It will only be filled up if an object has been created/updated and will be all zero if the error occurred before an object has been created. - The
ElapsedTimefield shows the time it took the system to successfully create and save the Proxy object with all data. At this point, the Proxy has been created, but the import to the real Ubik object is executed asynchronously and cannot be predicted. - The
Messagefield shows a status message or the details, if an error occurred.
Authentication Mechanism
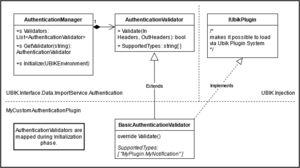
There is currently no default implementation, so in order to get the Web Service running, one plugin containing a custom ImportValidator has to be provided.
It contains a single method to override, Validate, which contains the headers of the incoming requests to validate the Authorization header. There is also a possibility to set the outgoing headers for the response, for example, to return a token that makes authentication easier next time.
Import Mechanism
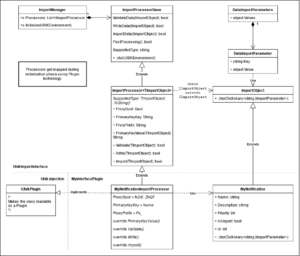
The Import Mechanism is the heart of the entire system. It is responsible for creating Ubik objects out of raw data, via proxies.
In its ideal use case, the interface runs the following steps:
- Creating
ImportObjectderivate out of the raw data - Loading
ImportProcessorderivate supporting the type ofImportObject - Validating the
ImportObjectwith theImportProcessor - Writing the
ImportObjectto a new or existing Proxy instance - Saving the Proxy
At this time, the data are successfully saved in Ubik and the interface returns a status and object information. However, there's some more stuff going on in the background:
- Async bulk-import of Proxy to create Ubik object
- Once finished and new items are queued, a new bulk-import will launch. If no import is queued, the customizable post processing method will be called.
Similarly to the Authentication System, this system can be customized via Plugins as well. Providing a custom ImportProcessor derivate with the target type set to a custom ImportObject derivate makes this processor available to be used to fit a use-case.
The Import System can be used by itself too, it's easy to integrate it to different interfaces. It can be made running synchronously as well, to be potentially even more efficient for specific custom implementations.

