Difference between revisions of "HowTo:Restrict Access to known Mobile Devices"
| Line 1: | Line 1: | ||
| − | In order to allow only dedicated mobile devices to connect to the UBIK system you have to | + | In order to allow only dedicated mobile devices to connect to the {{UBIK}} system you have to follow some steps: |
| − | |||
| − | |||
| − | |||
| − | |||
| − | |||
| − | |||
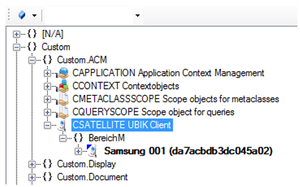
| − | # | + | # Create a new instance of the Metaclass CSATELLITE (Namespace Custom.ACM) <br/>[[File:Activation_01.png|300px|Step 1]] |
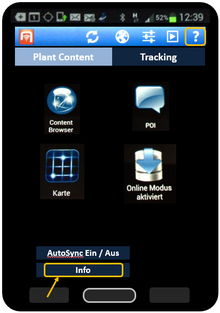
| − | # | + | # Retrieve the Device ID of your mobile device by touching the question mark icon and open the ''About'' dialog<br/>[[File:Activation_05.png|220px|Step 5]] |
| − | # Open the file | + | # Use the Device ID of your mobile device as name for the new instance<br/>[[File:Activation_02.png|500 px|Step 2]] |
| − | # Within | + | # Open the file [[UBIK Web Service Configuration|web.config]] on the server your [[Setup UBIK WebServices|{{UBIK}} WebService]] is running |
| − | + | # Within this file, change the value of ''UBIK.Service.DeviceRestrictive'' to ''"1"''<br/>[[File:Activation_04.png|300 px|Step 4]] | |
| − | + | ||
Revision as of 10:33, 21 October 2013
In order to allow only dedicated mobile devices to connect to the UBIK® system you have to follow some steps:
- Create a new instance of the Metaclass CSATELLITE (Namespace Custom.ACM)

- Retrieve the Device ID of your mobile device by touching the question mark icon and open the About dialog

- Use the Device ID of your mobile device as name for the new instance

- Open the file web.config on the server your UBIK® WebService is running
- Within this file, change the value of UBIK.Service.DeviceRestrictive to "1"

