
Difference between revisions of "HowTo:Install UBIK Database"
(→Setting up {{UBIK}} database) |
(→Setting up {{UBIK}} database) |
||
| Line 2: | Line 2: | ||
== Setting up {{UBIK}} database == | == Setting up {{UBIK}} database == | ||
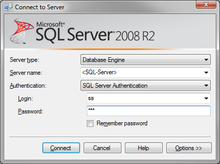
| − | # Start the ''Microsoft SQL Server Management Studio'' and connect to the database server<br/> | + | # Start the ''Microsoft SQL Server Management Studio'' and connect to the database server<br/>[[File:UI_SettingUpUBIKDatabase_01.png|220 px|alt=Microsoft SQL Server Management Studio|Microsoft SQL Server Management Studio]] |
| − | [[File:UI_SettingUpUBIKDatabase_01.png|220 px|alt=Microsoft SQL Server Management Studio|Microsoft SQL Server Management Studio]] | + | |
# Navigate to ''Databases'' and add a new database | # Navigate to ''Databases'' and add a new database | ||
# Choose ''Tasks → Restore → Database'' from the context menu | # Choose ''Tasks → Restore → Database'' from the context menu | ||
Revision as of 13:26, 30 September 2013
All content and configuration data of UBIK® is managed in a Microsoft SQL database (2008 R2 or newer). Once the SQL server engines is installed successfully, an administrator can set up a new UBIK® database simple using the available release database.
Setting up UBIK® database
- Start the Microsoft SQL Server Management Studio and connect to the database server
- Navigate to Databases and add a new database
- Choose Tasks → Restore → Database from the context menu
- Choose the newly created database in the setting In database
- Choose the copied backup file in From media
- Check the Restore flag

- Switch to the options-slider and check Overwriting actual data (if necessary)
- Finish the process by clicking the OK
Requirements
- Database user must have role sys.admin
- Database user has to be dbo of UBIK® database
- If Windows firewall is active, the SQL server port 1433 must be unlocked