Difference between revisions of "HowTo:Save Settings as Presets"
| Line 2: | Line 2: | ||
After logging in, perform the following steps: | After logging in, perform the following steps: | ||
| − | # Go to [[Settings]] | + | # Go to [[UBIK_Client_Basics#Options|Settings]] |
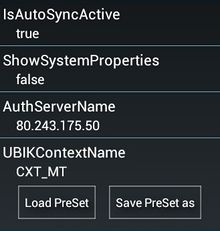
# Press {{key press|Save PreSet as}} at the bottom of the screen<br/>[[File:UI_HowTo_Save_Settings_As_Presets_01.jpg|220 px|border|alt=Save preset as|Save preset as]] | # Press {{key press|Save PreSet as}} at the bottom of the screen<br/>[[File:UI_HowTo_Save_Settings_As_Presets_01.jpg|220 px|border|alt=Save preset as|Save preset as]] | ||
# Enter a name for the new preset<br/>[[File:UI_HowTo_Save_Settings_As_Presets_02.jpg|300px|border|alt=Enter name for preset|Enter name for preset]] | # Enter a name for the new preset<br/>[[File:UI_HowTo_Save_Settings_As_Presets_02.jpg|300px|border|alt=Enter name for preset|Enter name for preset]] | ||
Revision as of 15:02, 14 January 2014
In order to save all the settings into a Preset, users have to login first.
After logging in, perform the following steps:
- Go to Settings
- Press Save PreSet as at the bottom of the screen

- Enter a name for the new preset

- Press OK to save
- If a preset with the same name already exists, either:

- Press OK to overwrite the existing one or
- Press Cancel and start over with a different name.
