
Difference between revisions of "HowTo:Install UBIK Database"
(→See also) |
|||
| (41 intermediate revisions by 4 users not shown) | |||
| Line 1: | Line 1: | ||
| − | + | All content and configuration data of {{UBIK}} is managed in a [http://www.microsoft.com/en-us/sqlserver/default.aspx Microsoft SQL] database (2019 or newer). Once the SQL server engines is installed successfully, an administrator can set up a new {{UBIK}} database simple using the available release database. | |
| − | + | Up from {{UBIK}} Version 4.0 you ony have to create a Empty Database and Configure {{UBIK}} to connect, it will create the Databasestrukture at first connect. | |
| − | + | ||
| − | + | ||
| − | + | <!--[[File:UI_SettingUpUBIKDatabase_01.png|thumb|alt=Microsoft SQL Server Management Studio|Microsoft SQL Server Management Studio]]--> | |
| − | # Start the | + | == Setting up {{UBIK}} database == |
| − | # Navigate to | + | # Start the ''Microsoft SQL Server Management Studio'' and connect to the database server |
| − | # | + | # Navigate to ''Databases'' and right click on ''Databases''→ select ''New database...'' |
| − | ## Choose the newly created database in the setting | + | # Right click on the newly created database and choose ''Tasks → Restore → Database'' from the context menu |
| − | ## Choose the copied backup file in | + | ## Choose the newly created database in the setting ''In database'' |
| − | ## Check the | + | ## Choose the copied backup file in ''From media'' |
| − | # Switch to the options-slider and check | + | ## Check ''Restore'' of the according backup set <br/> [[File:Restore Database.PNG| 440px|border]] |
| − | # Finish the process by clicking | + | # Switch to the options-slider and check ''Overwriting actual data'' (if necessary) |
| + | # Finish the process by clicking {{key press|OK}} | ||
| − | |||
| − | |||
| − | |||
| − | [[Category:UBIK | + | {{Attention|Use maintenance plans for periodic backup of your own and the system databases!}} |
| − | [[Category: | + | |
| + | == Requirements == | ||
| + | === Database user === | ||
| + | The database user configured in {{UBIK}} Studio used to connect to the database needs | ||
| + | * to have the role ''sys.admin'' assigned | ||
| + | * to be marked as ''Database owner'' (dbo) of the according {{UBIK}} database | ||
| + | |||
| + | === Windows firewall === | ||
| + | For a non-local SQL server make sure that the SQL server port (default: 1433) is unlocked by the Windows firewall Inbound and Exbound rules. | ||
| + | |||
| + | == See also == | ||
| + | * [[FAQ:Installation_and_Configuration#Network|FAQ: Installation and Configuration / Network]] | ||
| + | |||
| + | [[Category:How-To|Install UBIK Database]] | ||
| + | [[Category:Installing|Install UBIK Database]] | ||
Latest revision as of 15:46, 21 January 2026
All content and configuration data of UBIK® is managed in a Microsoft SQL database (2019 or newer). Once the SQL server engines is installed successfully, an administrator can set up a new UBIK® database simple using the available release database. Up from UBIK® Version 4.0 you ony have to create a Empty Database and Configure UBIK® to connect, it will create the Databasestrukture at first connect.
Contents
Setting up UBIK® database
- Start the Microsoft SQL Server Management Studio and connect to the database server
- Navigate to Databases and right click on Databases→ select New database...
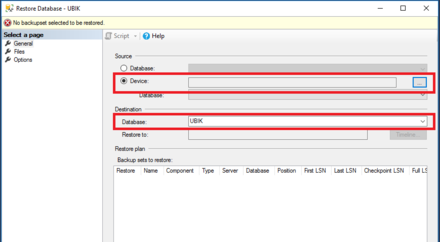
- Right click on the newly created database and choose Tasks → Restore → Database from the context menu
- Choose the newly created database in the setting In database
- Choose the copied backup file in From media
- Check Restore of the according backup set
- Switch to the options-slider and check Overwriting actual data (if necessary)
- Finish the process by clicking OK

| Use maintenance plans for periodic backup of your own and the system databases! |
Requirements
Database user
The database user configured in UBIK® Studio used to connect to the database needs
- to have the role sys.admin assigned
- to be marked as Database owner (dbo) of the according UBIK® database
Windows firewall
For a non-local SQL server make sure that the SQL server port (default: 1433) is unlocked by the Windows firewall Inbound and Exbound rules.