Difference between revisions of "UBIK Studio Manual"
(→2. Create Metaclasses and Properties) |
(→2. Create Metaclasses and Properties) |
||
| Line 23: | Line 23: | ||
==2. Create Metaclasses and Properties== | ==2. Create Metaclasses and Properties== | ||
| + | MetaClasses define new object types within the UBIK® data model, while MetaProperties define the corresponding attributes of these object types. Creating custom MetaClasses and MetaProperties is what allows the data model to be extended beyond the standard objects to meet customer-specific requirements. | ||
| + | <br> | ||
To create a new metaclass, right-click on "NAMEDBASECLASS" -> "Derive new object". | To create a new metaclass, right-click on "NAMEDBASECLASS" -> "Derive new object". | ||
<div style="margin-bottom: 20px;"> | <div style="margin-bottom: 20px;"> | ||
| Line 31: | Line 33: | ||
|} | |} | ||
</div> | </div> | ||
| − | + | <br> | |
| − | + | <div style="float:left; margin: 0 20px 15px 0;"> | |
| − | <div style="margin: 20px 0;"> | + | [[File:Metaclass3.png|none|220px|link=]] |
| − | [[File:Metaclass3.png|none| | + | |
</div> | </div> | ||
| + | When the newly created metaclass is opened in an ObjectEditor, the properties of the metaclass can be edited. The name and description are mandatory fields, and it is recommended to write the name in uppercase letters. The namespace is optional, and there is also a checkbox for selecting multilanguage. To save the changes, first click in a new line and then select the floppy disk icon. | ||
| + | <br style="clear:both" /> | ||
<div style="margin-bottom: 20px;"> | <div style="margin-bottom: 20px;"> | ||
{| style="margin-left: 0;" | {| style="margin-left: 0;" | ||
| − | + | | [[File:Metaclass5.png|none|400px|link=]] | |
| − | + | ||
| − | | [[File:Metaclass5.png|none| | + | |
| − | + | ||
</div> | </div> | ||
To add properties to a metaclass, CUSTOMMETAPROPERTIES are required. To access the CUSTOMMETAPROPERTY, switch to the Content view in the ClassBrowser. Then, drag Custom -> Main -> Base -> CUSTOMMETAPROPERTY into the BulkEditor. When creating a new property, first specify the name and description. Next, define the namespace and the data type. | To add properties to a metaclass, CUSTOMMETAPROPERTIES are required. To access the CUSTOMMETAPROPERTY, switch to the Content view in the ClassBrowser. Then, drag Custom -> Main -> Base -> CUSTOMMETAPROPERTY into the BulkEditor. When creating a new property, first specify the name and description. Next, define the namespace and the data type. | ||
| − | |||
<br style="clear:both" /> | <br style="clear:both" /> | ||
| + | <div style="margin-bottom: 20px;"> | ||
| + | {| style="margin-left: 0;" | ||
| + | | [[File:Metaclass4.png|none|400px|link=]] | ||
| + | </div> | ||
To add the newly created properties to a metaclass, drag the corresponding metaclass into the ClassDetails Editor. Then, drag the desired properties from CUSTOMMETAPROPERTY into the metaclass. | To add the newly created properties to a metaclass, drag the corresponding metaclass into the ClassDetails Editor. Then, drag the desired properties from CUSTOMMETAPROPERTY into the metaclass. | ||
| + | <br style="clear:both" /> | ||
[[Category:Pages with broken file links|UBIK Studio Manual]] | [[Category:Pages with broken file links|UBIK Studio Manual]] | ||
Revision as of 10:03, 15 July 2026
Contents
- 1 1. Connect to a Database
- 2 2. Create Metaclasses and Properties
- 3 3. Creating SelectiveList and SelectiveItem
- 4 4. Create References and Links
- 5 5. Create View
- 6 6. Rebuild
- 7 7. View Test Environment
- 8 8. Scopes and display in the Client
- 9 9. Release Metadefinitions
- 10 10. Create User
- 11 11. Create Workpackages and Tasks
- 12 12. Editors
1. Connect to a Database
The Options dialog can be opened via the icon located in the top-left toolbar, directly below the main menu bar.


Click Apply and OK. It is also possible to run UBIK Studio using "WindowsAuthentication". To do this, the option in the "WindowsAuthentication" column must be set to "true" (in which case the username and password fields do not need to be filled in).
Important:
- Database
- Datasource
- Password
- User
2. Create Metaclasses and Properties
MetaClasses define new object types within the UBIK® data model, while MetaProperties define the corresponding attributes of these object types. Creating custom MetaClasses and MetaProperties is what allows the data model to be extended beyond the standard objects to meet customer-specific requirements.
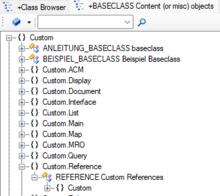
To create a new metaclass, right-click on "NAMEDBASECLASS" -> "Derive new object".
 |
 |

When the newly created metaclass is opened in an ObjectEditor, the properties of the metaclass can be edited. The name and description are mandatory fields, and it is recommended to write the name in uppercase letters. The namespace is optional, and there is also a checkbox for selecting multilanguage. To save the changes, first click in a new line and then select the floppy disk icon.
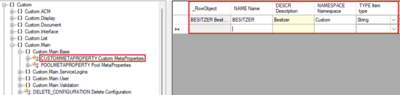
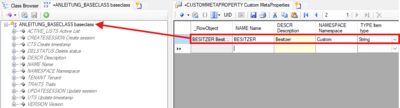 To add properties to a metaclass, CUSTOMMETAPROPERTIES are required. To access the CUSTOMMETAPROPERTY, switch to the Content view in the ClassBrowser. Then, drag Custom -> Main -> Base -> CUSTOMMETAPROPERTY into the BulkEditor. When creating a new property, first specify the name and description. Next, define the namespace and the data type.
|