Difference between revisions of "Smart Studio"
m (NWE moved page SmartStudio to Smart Studio) |
(→Environment Page) |
||
| Line 38: | Line 38: | ||
=== Environment Page === | === Environment Page === | ||
There is an Environment page for publishing ACM and programmatic customizing as well; it can be accessed using the Start page or the menu, if a {{UBIK}} Environment is connected. | There is an Environment page for publishing ACM and programmatic customizing as well; it can be accessed using the Start page or the menu, if a {{UBIK}} Environment is connected. | ||
| + | |||
| + | It provides the following sub-sections for controlling the {{UBIK}} environment; ''Customizing'' and ''Application''. | ||
| + | |||
| + | ==== Customizing ==== | ||
| + | |||
| + | The ''Customizing'' sub-section allows to check and deploy the programmatic customizing for the active environment (not project-related). | ||
| + | It consists of a view for showing the custom code and several commands for checking, compiling and deploying it. | ||
| + | |||
| + | The following commands are available: | ||
| + | * Assemble custom code from the MetaClasses (using the menu button or {{key press|F5}}) | ||
| + | * Check the custom code for syntax errors (using the menu button or {{key press|F6}}) | ||
| + | * Compile & deploy the customizing locally (using the menu button or {{key press|F7}}) | ||
| + | * Deploy the previously compiled customizing to the server (using the menu button or {{key press|F8}}). | ||
| + | All commands depend on the previous commands (in the above order), for safety reasons. | ||
| + | |||
| + | ==== Application ==== | ||
| + | |||
| + | The ''Application'' sub-section allows to check and deploy the ACM ''Meta Definitions'' for the active environment (not project-related). | ||
| + | More precisely, the ''Meta Definitions'' for a specific ''Context'' can be managed, which means that you have to select an ''Application'''s ''Context'' before you can do anything. | ||
| + | |||
| + | The sub-section consists of a selection area, where you can specify the ''Context'' to be managed - drag & drop an ''Application'' object into the selection area in order to show the available ''Contexts''. Also, there is a view showing the assembled ''Meta Definitions'' as XML for inspection. There are commands available for assembling and deploying the ''Meta Definitions''. | ||
| + | |||
| + | The following commands are available: | ||
| + | * Assemble all ''Meta Definitions'' for the selected ''Context'' (using the menu button or {{key press|F9}}) | ||
| + | * Deploy the previously assembled ''Meta Definitions'' to all {{UBIK}} satellites via the web services (using the menu button or {{key press|F10}}) - don't forget to restart the web services to make sure the changes are applied correctly! | ||
| + | All commands depend on the previous commands (in the above order), for safety reasons. | ||
[[Category:Smart Modelling|Smart Modelling]] | [[Category:Smart Modelling|Smart Modelling]] | ||
Revision as of 18:49, 27 December 2016
With the UBIK® Smart Studio, project engineering is made easier: Smart Modelling means to build meta models, do programmatic customizing and ACM configurations without having to work all the repetetive details. UBIK® Smart Modelling automates as much as it can in order to give the engineer leeway to actually do the project.
Contents
Usage
Basic handling idea
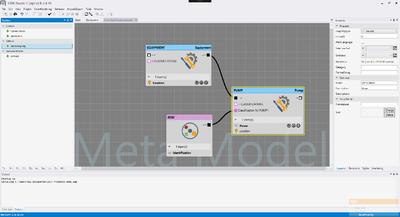
In the middle of the screen, there is a worksheet that can be used to draw the project structure on. Add new or existing models by dragging them from the pickers on the left of the screen to the worksheet area in the middle. Connect the models using lines in order to define the model's dependencies on each other. When a model is selected, it can be edited using inspector tools on the right of the screen.
Inheritance Graph and Application Graph
There are two kinds of worksheets with different responsibilities: The Inheritance Graph allows the user to create meta models. It's called "Inheritance Graph" because the MetaClasses' inheritance structure is displayed graphically. The Application Graph can be used to define what the user can see on the mobile device. It's called "Application Graph" because the browsing hierarchy for the mobile application is displayed graphically. One can define specific mobile versions of MetaClasses (namely Scopes) as well as their properties and children with it.
Organizing your work
In order to organize your work and to separate modelling from working directly on the (productive) system, there are Smart Projects. They serve as a container for your work and as an indepent entity with the possibility to punctually interact with UBIK® Environments (databases).
Smart Projects
Smart Projects are containers for Smart Modelling data. A Smart Project contains worksheets and Smart Models and is stored in a file with the extension "*.smp". Projects are independent from UBIK® Environments, per se. Only one project can be opened at a time. A project must be opened in order to create worksheets.
Start page
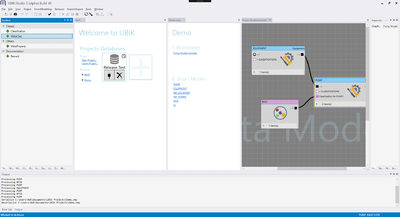
After opening the UBIK® Smart Studio, the Start page is available. It shows recently used project and UBIK Environment connections (database connections). It can also be used to open or create Smart Projects.
Project page
Once a project is opened, there is a project page listing all the work sheets (e.g., Inheritance Graphs or Application Graphs) as well as all the models in the project.
Worksheets
A project can have multiple worksheets with overlapping content (i.e., models that exist in multiple worksheets). Changing a worksheet can affect other worksheets after saving the change in order to keep consistency.
Project models
The project's models can be selected and added to worksheets using the Smart Studio's object pickers.
UBIK® Environment
Once a UBIK® Environment is connected, the Smart Studio's object pickers provide all the models from the environment. These models can be used in work sheets. Worksheet situations can be released to the UBIK® Environment that is currently connected; the result can then be saved to the project in return. Only one UBIK® Environment can be connected at a time.
Environment Page
There is an Environment page for publishing ACM and programmatic customizing as well; it can be accessed using the Start page or the menu, if a UBIK® Environment is connected.
It provides the following sub-sections for controlling the UBIK® environment; Customizing and Application.
Customizing
The Customizing sub-section allows to check and deploy the programmatic customizing for the active environment (not project-related). It consists of a view for showing the custom code and several commands for checking, compiling and deploying it.
The following commands are available:
- Assemble custom code from the MetaClasses (using the menu button or F5)
- Check the custom code for syntax errors (using the menu button or F6)
- Compile & deploy the customizing locally (using the menu button or F7)
- Deploy the previously compiled customizing to the server (using the menu button or F8).
All commands depend on the previous commands (in the above order), for safety reasons.
Application
The Application sub-section allows to check and deploy the ACM Meta Definitions for the active environment (not project-related). More precisely, the Meta Definitions for a specific Context can be managed, which means that you have to select an Application's Context before you can do anything.
The sub-section consists of a selection area, where you can specify the Context to be managed - drag & drop an Application object into the selection area in order to show the available Contexts. Also, there is a view showing the assembled Meta Definitions as XML for inspection. There are commands available for assembling and deploying the Meta Definitions.
The following commands are available:
- Assemble all Meta Definitions for the selected Context (using the menu button or F9)
- Deploy the previously assembled Meta Definitions to all UBIK® satellites via the web services (using the menu button or F10) - don't forget to restart the web services to make sure the changes are applied correctly!
All commands depend on the previous commands (in the above order), for safety reasons.


